Extension for the case of larger sets (October 3, 2007):
Let us now add CS with the institutional addresses to the database by importing CS.dbf. (You may have to minimize a few windows before you are allowed to import external data.) Set the relations between CS and CORE using the relating field NR. In order to do so, you have to add the table CS first to the relationships by dragging it there. (Do not set a direct relation between AU and CS because this may lead to confusion.)
Create a Query in Design View and Add CS and CORE. Select from CS the field “country” and from CORE the field “py” (publication year). Select among the queries in Query at the top of the window “Crosstab Query.” You obtain an additional line in the design window entitled “Crosstab.” By clicking on the field you can choose the row and column captions. Choose “Row heading” for Country and “Column heading” for “PY.” Additionally, you need to specify what is counted in the table. For that purpose use NR from CORE. Specify at the line Total “Count” and at Crosstab “Value”. You should have it like this:
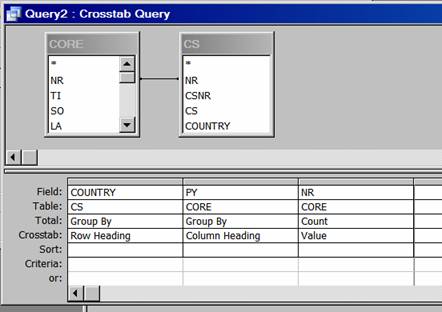
Run the query by hitting the red exclamation mark. This should provide you with crosstabulation of countries versus publication years. This cross tabulation can be copied into Excel for further processing if you wish.
Extension for the return to the ISI format (October 30, 2007)
The program Acc2ISI.exe allows you (in combination with ISI.exe) to go back and forth between the data manipulation in MS Access (or another database program and the so-called “tagged” format that is output of the Science Citation Index at the ISI Web-of-Knowledge.
To select, for example, all records from the United States (within Access), you first have to add an in-between table COUNTRY which provides one-to-one relations between country names and records in CORE because there can be records with more than one address in the USA. (They would then be counted twice.)
- In queries, choose create a new query in design view.
- Set the relation between CORE and CS as above. Use the fields Nr from CORE and Country from CS.
- Double click on the above side of the relation and set the value to unique in the Query properties. Run the query.
- Save the query as a table with the name COUNTRY by using Make-Table Query.
- Save the table; create a new query in design view.
- From the pop-up window that appears, select the table CORE and COUNTRY
- Make sure there is a relationship between the NR in the CORE table and the NR in COUNTRY table. If there is no relationship create it by dragging NR from one table to the other.
- Bring every element of the table CORE to the query ( “*” automatically brings all elements from the specified table)
- Choose “COUNTRY” from COUNTRY
- You want to have only those records that correspond to papers published in the United States. So in the Column “COUNTRY” in the row “Criteria” specify “USA”
- Because you want the table to keep the format of the table CORE; in the column COUNTRY, in the row “Show” make sure that the box remains without a checkmark.
- Run the query (red exclamation mark)
- Save the query as CORE_USA
- Once the query is saved you can export it in other formats. In file, choose export, “in save as type” select dbase III and export all to CORE.DBF.
In order to make the same selection for the USA on AU, CS, and CR:
- In queries, choose create a new query in design view.
- From the pop-up window that appears, select the table AU and under Queries select CORE_USA. This will provide you with a file including all authors of these papers.
- Make sure there is a relationship between the NR in the CORE_USA table and the NR in AU table. If there is no relationship create it by dragging NR from one table to the other.
- Bring every element of the table AU to the query ( “*” automatically brings all elements from the specified table)
- Run the query (red exclamation mark)
- Save the query as AU_USA
- Once the query is saved you can export it in other formats. In file, choose export, “in save as type” select dbase III and export all to AU.DBF.
- You can repeat from step 15 but using the table CR and CORE_USA or CS and CORE_USA, respectively. Save as CR_USA and CS_USA, and export as CR.DBF and CS.DBF, respectively. Note that CS.DBF will contain all addresses belonging to the set (including non-US addresses).
You can use the files AU.DBF, CORE.DBF, CR.DBF and CS.DBF as input to ACC2ISI.EXE. These files have to be in the same folder.
Acc2ISI.exe requires that you rename the exported files with the original names core.dbf, au.dbf, cs.dbf, and cr.dbf. These should be in the dBase format. It generates a file isi.txt that can be imported in HistCite™ or any of the programs available on this site for the bibliographic mapping (e.g., CoAuth.exe).
Loet Leydesdorff & Diana Lucio-Arias
Amsterdam, October 2007